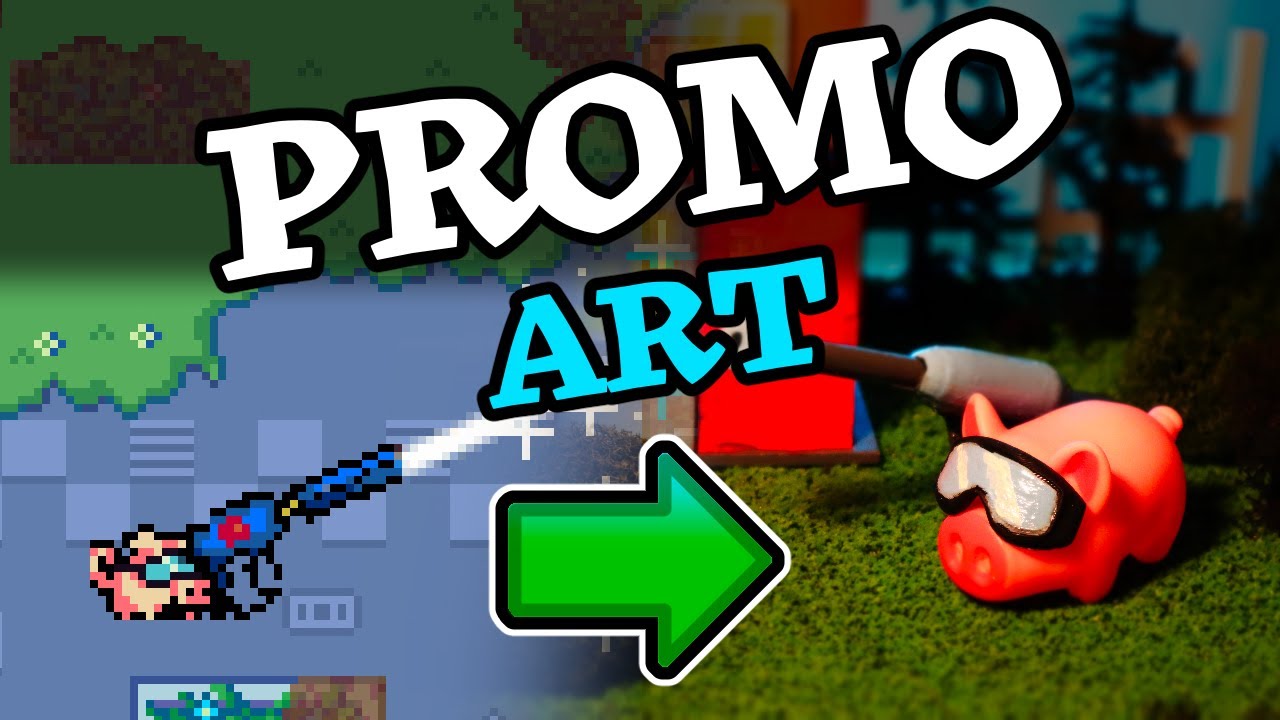
🔥 Steam Game Promo Art - Photography and Fire
Now Playing
🔥 Steam Game Promo Art - Photography and Fire
Transcript
486 segments
welcome to my midlife crisis this is the
story of the new key art for Pixel
washer which for reasons we'll get into
I decided to photograph in real life I
bought tiny toy pigs adorned them with
3D printed goggles and power washers
then of course meticulously hand painted
an environment of models for the pig to
power wash all this when I'm trying to
ship a game as a solo Dev because I love
over scoping in this video we'll cover
the process I followed the final results
and whether or not you might want to try
this approach for your game part one get
some models first things first I needed
some models to photograph which means it
was time to go shopping and you can't go
shopping without a shopping list mine
including this stuff a pig goggles a
power washer objects to wash stuff for
the pig to stand on an environment to
exist in and a sign with letters that
spell pixel washer so I wandered around
Michael another hobby stores looking for
an assortment of you know stuff to wash
I didn't really have a specific idea
just yet I more wanted to browse to
peruse and wait for something to speak
to me eventually I gathered an
assortment of exterior objects including
fences houses and some foliage to make
the scene look more
organic probably my favorite purchase
was this wooden model house which has
lights you can turn on and off Good
Times part two prove the concept now
that I had some stuff to shoot it was
time to prove the concept first I set up
what I had so far and I took some very
strange slow motion video of that
because I'm still learning how to use my
camera more on that later next I took
some basic photos to answer the question
is this going to work or not at this
very early stage I like to think about
the process as sketching lightly on
paper I'm not trying to bolt anything
down yet I'm just you know drawing
lightly and exploring at the end of this
quick test I felt like the concept was
proven with just a little bit of effort
I could see that this project could pan
out but there was still a big problem
problem the pig just wasn't quite right
part three find the perfect Pig finding
the perfect Pig took a fair amount of
trial and error I bought a few different
kinds online to try them out the first
was a big pack of cute little bright
pink piggies I thought these might work
because they came in lots of different
poses but they didn't have the right
feel for Pixel washer next I tried
experimenting with 3D printing and I
want to thank Ashley for donating time
material and shipment and patience to my
little project here I sent Ashley some
3D models and she shipped me some cute
piggies goggles and power washer guns
which I'll talk more about in part five
I didn't end up using these models in
the final shoot but having access to 3D
printing having something tangible in my
hands this was definitely helpful for
getting the project to The Next Step
overall I hadn't found the right Pig yet
so I tried to think outside the box
instead of buying intricate plastic
models or printing them I bought a box
of squeaky toys and I kind of felt like
like these were
[Music]
perfect but this pig wasn't my little
pixel just yet because we still needed
goggles cool part four procure the
goggles finding the right goggles ended
up being really challenging and one of
the most difficult parts of this process
I shopped a lot looked at random toys
Barbie dolls and anything I thought
might have accessories or otherwise some
kind of sunglasses or anything
appropriate that I could glue to my pigs
then my wife discovered that our local
library has a place called Creation
Station with 3D printers and lots of
other Hardware available to the public
for super cheap one time they charged me
literally 25 cents to print a bunch of
little objects so I emailed them some
goggles models and we were off after a
few days they sent me a photo of the
printed goggles and I went to pick them
up they kind of looked like they were
melting into puddles but that's just
some leftover bits of material from the
printing process and easily removable
right away they were looking quite
Dapper on my little piggy so I grabbed a
squeaky toil glued on some goggles then
positioned it carefully so that they'd
stay on while drying part five make a
power washer pixel is made up of three
components the pig the goggles and the
power washer with 2/3 of those in the
can it was time to focus on the power
washer now that I knew I had easy access
to local 3D printing I needed some
models so I downloaded some royalty-free
everyday objects and began kit bashing
stuff in blender now I'm primarily a 2d
game developer main examples being a
Wizard's lizard and now pixel washer so
I'm not terribly experienced with 3D and
especially not in blender blender is
notoriously difficult to learn and I
don't know what I'm doing so I tried to
just focus on the bare minimum things to
learn to get my models made first I
tried to Simply extend the nozzle of a
water gun that looks like a classic
Super Soaker style water gun this was
with mixed results because again I don't
know what I'm doing I also combined the
handle of a clamp and like a giant
crayon or something but uh no that was
wasn't working lastly I tried combining
the handle of a hacksaw with an enlarged
TRS cable like you'd find on a pair of
headphones I stumbled my way through
blunder to slice and dice and rotate and
shove these things together naturally
this model had a lot of issues that the
printing service pointed out but after a
few rounds of emails we got them printed
successfully even though they weren't
perfect these ended up being the power
washers that I moved on to the next
stage part six compose the scene we're
not done yet but let's take some photos
anyway I wanted to have have something
to work with and I wanted to further
test out the concept so I took over my
dining room table laid out all the stuff
I'd gotten so far and set up my camera
on a tripod I also like to have portable
colored lights on hand that I can place
anywhere and adjust freely first I began
taking pictures starting off with shots
during the day it was really interesting
seeing the cast Shadows move across the
scene as the day went on and the Earth
and Sun did their little dance I liked
the look of the natural light but I
wanted more control over the amount of
light and where it hit the scenes so I
also took some photos at night with lots
of different lighting effects I knew I
need some photos with the sign and
without the sign so I took both next I
tried a bunch of dramatic lighting tests
ranging in Hue brightness and placement
I know I said that I proved the concept
earlier but I think this step is what
really solidified the concept in my mind
and made me want to keep pushing forward
at this point I was in I really liked
this project so after doing a few more
test shots I landed on some favorites
they are place holdery works in progress
but I still think they have a lot to
offer in fact I liked one photo so much
I ended up using it on my steam page for
many months it even printed it in my
book how to make a video game all by
yourself part seven test the colors next
I took some of my favorite photos from
the shoot and brought them into clip
Studio paint so I could determine what
colors to use I did it this way because
it is much much easier to change the
colors using software before committing
to physically painting so I carved out
sections in the image with the Marquee
tool these sections included the house
its door windows walls and the fences
then I colorized those sections with
different color schemes I played with
very different looks for the house some
kind of drab some very colorful I wanted
a generous range of contrast so I could
make obvious comparisons eventually I
whittel them down to just four options
and with input from my wife decided on
the one with a very bright bold scheme
pixel washer is a colorful Whimsical
game I wanted the colors to match that
look and feel part eight pink paint the
models now for the fun part my goal When
painting this scene was to be quick and
dirty to make it good enough which made
this process enjoyable it was so
satisfying painting a little bit each
day letting it dry working on my game
returning to the scene applying another
coat Etc the house was easy and fun to
paint this was probably the most
enjoyable object to work on I knew it
didn't need to be perfect because it
would be in the background and we'd only
ever see it from the front face which to
be fair had the most tiny bits on it and
was the most challenging to paint but I
genuinely enjoyed painting the house now
when I'm at Hobby Stores I find myself
eyeballing other similar objects that I
might find an excuse to paint so I
wouldn't be surprised to see more photos
like these in the future eventually I
did find a water gun model that I liked
even better than the previous one after
some cleanup they ended up looking
pretty cool the power washers were a bit
more challenging to paint for sure
because they're so tiny but it was fun
coming up with color combinations for
the guns I ended up going with two blue
ones with with various shades of blue
and black and a green one for good
measure the goggles were easily the
hardest to paint they are so small and I
knew they would get more scrutiny than
other objects because they're on my
protagonist's face some photographs will
focus on the pig's goggles specifically
so the viewers eyes will be drawn to
them that means they can't be complete
garbage they did end up being pretty
much complete garbage but I think it's
fine it's fine it's fine next I started
painting the signs now these were
totally optional because in most of my
promotional Mater material I overlay the
pixelated pixel washer logo instead of
using a diagetic one so I didn't need
these signs but I wanted to make them
because I thought it would be fun and
maybe useful naturally the signs ended
up being more work than almost anything
else the letters needed lots of coats
and precise painting and again they
weren't even necessary which reminds me
of game development it's like I overs
scoped this project and ended up cutting
a big chunk of the work Game Dev
problems accomplished game development
seeped its way into the real world
here's a final thought about this part
that I had while applying a second layer
of coding to my objects if I had known
from the beginning how much work this
was going to be I might not ever have
started which again reminds me of game
development or bookwriting or any other
large project I think the takeaway is
that when starting on projects allow
yourself to think that it'll be easier
to finish than it will be this helps you
charge forward and figure it out as you
go
part nine take final photos before we
get into the final photos you might be
curious about the camera I used which
was the Canon EOS M50 if you want to
know more about this camera you can read
my guide Matt's Canon EOS M50 guide on
rto.com before I could take my photos I
first had to create a Contraption to
hold the power washer gun so pixel
wouldn't have to after trying a few
things that didn't quite work I ended up
using a PIN to clamp the gun plus a
couple of magnets to weigh the pin down
this worked great so I made one for each
of the three guns now that I had
everything in its place or me and plus
if you're trying to sound like a fancy
Chef I was ready to set up the shop I
cleaned up the paint and prepared to
take over the dining room table for
another indeterminant amount of time
after remembering my unwieldy 20x 30in
Blue Sky foam board I summoned the sky
and was getting closer to shooting
eventually I had a nice cozy little
environment that was fun to exist
in the next morning I wanted to take
advant of the sunlight so I rotated my
environment to face East the sunlight
was pretty intense but it lit up all the
little details quite nicely the downside
was that my door actually cast a big
Shadow over the whole set which made it
difficult to get the exact shots that I
wanted that same morning I decided to
experiment with my camera a bit so I
tried some of the various settings and
filters it has including black and white
fisheye lens whatever that is something
else and a toy miniature effect which I
really liked it ended up using a lot
the takeaway here is to experiment play
around with your tools and see what
they're capable of some of their
features might surprise you later that
afternoon when the sun disappeared above
the roof I took some shots that were
free from the tyranny of the
Shadows again I tried some effects
because why not and while the angle
wasn't quite right for the final images
I was really happy with the overall
direction of this shoot lastly that
night I got to control the lighting
exactly as I wanted and finally got the
shots I was looking for everything
really came together in the end and I
was happy to finally complete this
project and restore my dining room table
to its previous usable State this means
we're finally ready to make some steam
capsules part 10 generate steam capsules
with this last batch of photos I took I
was able to generate all the assets I
needed for steam these images are now
live on Pixel washer steam page so when
you have a minute take a look in
addition to the standard key art I now
have a variety of photos for all the
various sizes of capsules banners and
other promo images on need as I promote
my game these are going to be great to
have on hand for presskits trailers
stickers and whatever else so after
hearing about this process you might be
wondering why do this why not hire an
artist or make some art myself I do have
a good reason Us game developers we're
really making software right games take
ages to make and for the vast majority
of their development we are tied to our
computers to make that software
sometimes I crave tangible solid objects
we live in a digital world but our
fleshy human hands want to grab a hold
of something to squeeze it to feel it in
our fingers to linger upon its surface
this is one of the reasons I wrote a
paperback book
specifically give me something real to
hold in my human hands my toy models
squeaky pigs and hand painted wood
pulled me away from the computer to
which I'm otherwise forever anchored
they allowed me to step away and get my
hands dirty also the desire to take
photos like these was deep in my bones
as I was inspired at an early age this
is a deep cut but did you ever see the
Nintendo Power Magazine that featured
Super Mario 2 on the cover they
photographed a handcrafted scene made
from what looks like clay including
mushrooms King warts and an odd carrot
carrying Mario an impressionable
8-year-old might not ever forget
something so cool and original so my key
art photography approach is kind of an
homage to Nintendo and the many other
games that did this including Ghouls and
ghost and Bubble Bobble for a whole
series dedicated to this kind of artwork
see touchy game art
lastly I just wanted to be creative for
the bulk of pixel washers levels I'm
using asset packs available from sites
like itch or Kenny it was tempting to
Simply hire an artist for the key art
and maybe I will someday but I also
wanted more of my own fingerprints to
come through in the game or at least its
promo materials being inspired to do
this procuring the models preparing them
and even photographing them each step
allowed me to flex my creative muscles
and remind myself why I enjoy wearing so
many hats this is one of the reasons I
wanted to make games in the first place
games are made up of art of gadgets of
sounds of music of world and of course
gameplay which brings it all together my
desire to make games is rooted in the
desire to do lots of different creative
things across different mediums and
pushing me out of my comfort zones so
when I should be programming sometimes
doing something that feels like the
opposite of shipping my game feels like
exactly the right thing to be doing also
this was just a fun project it's got
pigs and paints and pictures and
procrastination
post project pondering so I know these
photos aren't for everyone I've actually
already received feedback from friends
at respect there's probably a keyart
approach that would help sell the game
better the thing is though I don't
really care because I wanted to do this
for myself I'm pleased with the result
and that's all that matters for now I do
want the game to be commercially
successful or whatever so down the road
I plan on commissioning an artist to
make more capsules then I can run an AB
test which is an experiment where you
determine which image people will like
better it might be that in the end
players just want to see pixel art in
the capsule or maybe a traditional
illustration will be what players prefer
I don't know but I am curious so someday
I'll find out in the meantime I've got
these photos I'm really happy with them
and I think that they make the game
itself kind of more interesting pixel
washer is a game about washing 2D pixels
specifically but with these photos we've
got a very different 3D way to think
about the concept and to look at the
game Pixel waser now also so proudly
joins the ranks of the games I grew up
with that took this physical photography
approach and I think that's pretty cool
lastly an obvious question is would I
recommend this approach for your game
yeah I mean this approach obviously
isn't for everyone it's time consuming
requires many steps and might not even
save you money sure the raw materials
could be less than 100 bucks but what
about your time paying an artist might
get the job done faster and better than
many days or weeks of this approach
could yield for you however I personally
enjoyed this process and I'm happy with
the results you might be a good
candidate for this approach if you are
not in an immediate hurry to have key
art want an excuse to get away from the
computer enjoy procuring little toys and
models enjoy painting and managing
objects and have a knack for lighting
and taking
photos here's one cool thing about this
approach now that I have these models I
can easily make like holiday themed
photos by adding a little Christmas
cheer I can help promote the game and I
can do this for any other holiday or big
event as long as I want to drag around a
bunch of toy models everywhere I go pack
them up put them in boxes carry them
around put them in
storage lug them around my whole life
[Music]
Interactive Summary
Ask follow-up questions or revisit key timestamps.
The developer shares their unique experience of creating physical, hand-crafted key art for their video game, Pixel Washer. Instead of relying solely on digital assets, they spent time sourcing toy pigs, 3D printing custom accessories like goggles and power washers, and meticulously painting an environment to photograph. This unconventional, time-intensive process served as a creative outlet that allowed them to step away from the computer, while also creating a distinct visual identity for the game inspired by classic, tactile marketing from the NES era.
Suggested questions
3 ready-made promptsRecently Distilled
Videos recently processed by our community